Riding a roadbike does not come naturally to everyone, and one particular source of frustration is the drop handlebars. I was frustrated by them too when I first started, and so I hope this illustrated introduction might be of some help. To preface, a couple of things to keep in mind: First, drop bars vary in shape. This post assumes that your bike is fitted with theflat ramp style of bars prevalent today - either the compact type found on most stock road/racing bikes, or the more classic style popular with the twine and shellack crowd (i.e. the Nitto Noodle, Grand Bois Maes, Velo Orange Course). I am also assuming that you are using contemporary"aero" style brake levers, with the brake cables hidden.Note that if you are dealing with a 1970s-80s roadbike (i.e. something like this), the shape of the original handlebars and brake levers will make some of the positions described here impossible. Not everyone agrees on which hand positions are best to use at which times, or even on what the positions are called. This write-up reflects my non-expert personal experiences, informed by local mentours.
Whether you are racing, touring or going on a leisurely ride, what makes drop handlebars special is the variety of hand positions they offer. I consider there to be 5 distinct positions available: The hoods, the hooks, the drops, the tops, and the ramps. Read on for a description of each.
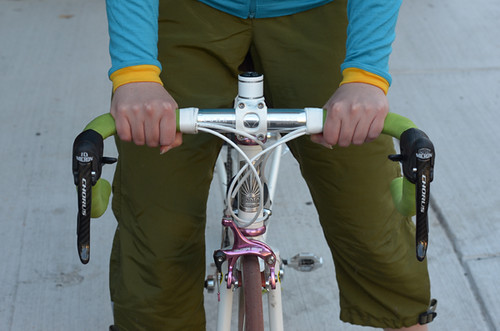
 1. The Hoods
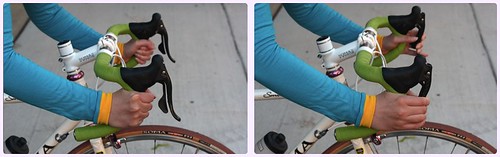
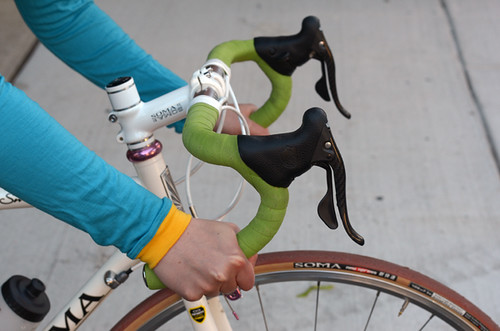
The "hoods" position refers to keeping your hands on top of the rubbery brake hoods, wrapped around them firmly. I think it is fair to say that today this is widely considered to be the standard, neutral position for riding with drop bars.When done correctly, it is extremely ergonomic, distributes the cyclist's weight nicely, and affords optimal leverage for cycling at different speeds. It is also a position from which the brake levers are easily accessible. Some cyclists report that the hoods make them lean forward too much. If this is the case, consider changing your handlebar setup - perhaps raising the bars, getting a shorter stem, or getting compact handlebars (with less distance between stem and hoods). On a properly fitted bike the hoods should feel easy and natural to reach.
There is a number of ways to hold your hands on the hoods, and this is how I usually do it. The main thing is to actually grip them and not just rest you hands upon them.
There are also different ways to brake from the hoods, and this is how I prefer to do it. Squeezing the brake lever with only two fingers while leaving the rest wrapped around the bars/hoods themselves ensures that my hands won't fly off the handlebars if I go over a bump.
For those accustomed to upright handlebars, the hoods position on a drop bar bike can feel awkward and disconcerting at first and can require some practice to use comfortably. It took me a couple of weeks before I really "got" the hoods, but once I did it's been true love. It's the position I use the most no matter what kind of riding I do. And if you are planning to take part in formal paceline training rides, chances are they will expect you to use the hoods as the standard position - and may even insist that you do so.
 2. The Hooks
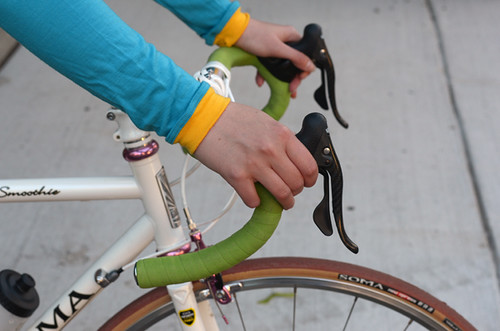
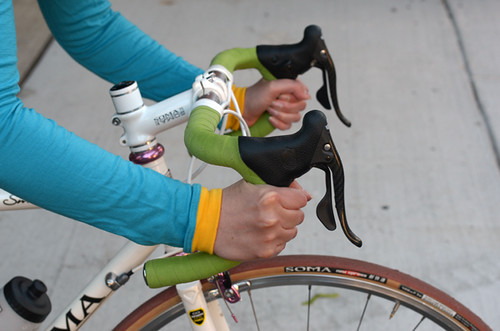
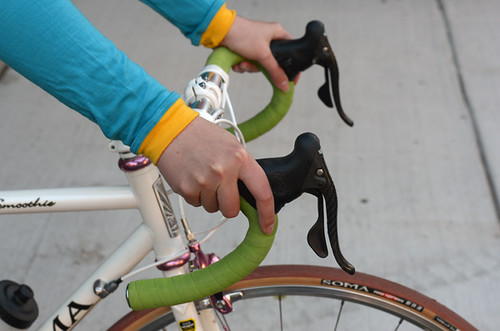
While often the position shown here is referred to as the "drops," there are actually two distinct drops positions. To differentiate between them, this one is more specifically known as "the hooks." It involves holding on to the parts of the bars that curve outward, with the cyclist's hands directly behind the brake levers. It is a more aggressive and aerodynamic position that the hoods, which makes it especially useful when cycling downhill and attempting to fight wind/air resistance.
The brake levers should be easily reachable from the hooks position. Braking in this manner is more powerful than from the hoods, because it affords greater leverage. It is important to be aware of this, so as not to accidentally slam the brakes when riding at high speeds.
 3. The Drops
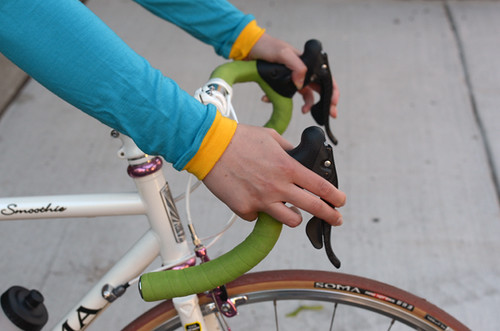
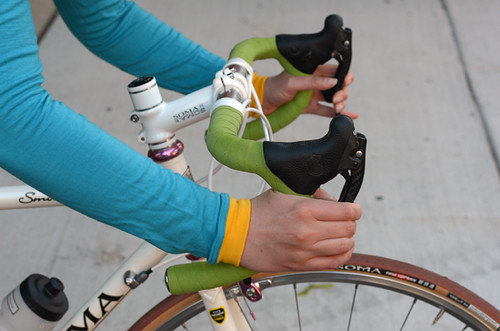
To differentiate from the hooks, this is what I will call the "true drops" position. To what extent the two positions are distinct really depends on the style of handlebars used. On some types of contemporary drop bars, the curvature here is so dramatic that the positions are very different - the true drops being parallel to the ground and the hooks perpendicular. On other drop bars the curve is less defined and it's hard to tell where the hooks end and the drops begin. Either way, the crucial distinction for me is that you can reach the brakes from the hooks, but not from this lower section of the drops.
Both the hooks and the lower drops positions are quite aggressive, and for beginners the crouching posture they put you in can feel scary. While at this stage I am more or less fine riding in these positions, even now I am still not as confident as I could be. Riding downhill in close proximity to others, I sometimes chicken out and stay on the hoods, simply bending my elbows a whole lot to get myself low enough over the bars. In a pinch, that tactic will do - but mastering the hooks and drops is ultimately worth it and I continue to work on it.
 4. The Tops
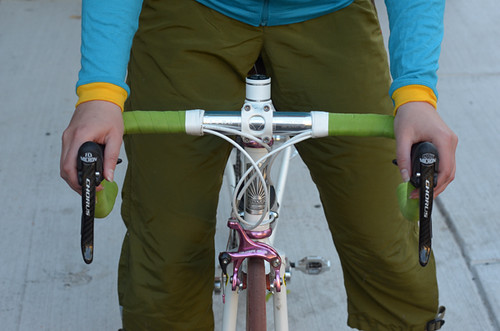
And now, the dreaded tops of the bars... My personal opinion is that the "tops" are bad news for beginners and are to be avoided until after you pick up some road cycling skills. Let me explain: Beginners who cannot use drop bars properly tend to hold their hands on the tops, because this reminds them of mountain bike handlebars and allows them to stay more upright than any of the other positions do. It feels safer. However, this is deeply problematic. First, you cannot reach the brakes from the tops. And if you are too scared to use the other positions, will you really be able to brake quickly and effectively when the situation calls for it? Probably not. Furthermore, drop bars are narrower than mountain bike handlebars, and holding the tops places the rider's hands too close to the stem - not the best position for controlling the bike. Nearly every time I see a beginner on a roadbike lose control of their bicycle, they are holding the tops.
That said, the tops do have their function. Some find this position helpful for climbing, as it opens up the chest and facilitates deep breathing. Also, when doing a long ride it's great to simply have it as yet another position for your restless hands. Personally, I almost never use the tops even in these circumstances, because my hands are uncomfortable. But not everyone has this issue.
 5. The Ramps
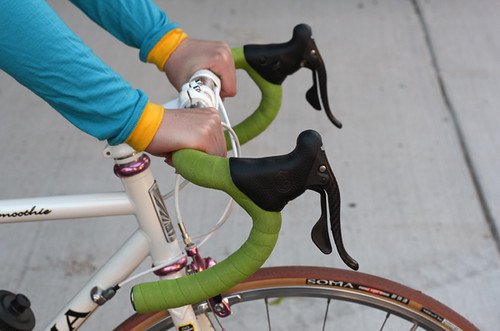
Finally, there is the rather difficult-to-photograph position called the "ramps," and I have also heard it referred to as the "shoulders." Located between the hoods and the tops, it involves holding the corners of the top portion of the handlebars. In this position the rider is more upright than on the hoods, while maintaining more control of the bike and a more ergonomic wrist position than they would on the tops. I hold my hands in this manner mostly on long rides, for short stretches at a time, when I want to do something different or be more upright for a bit.

All these new positions can certainly be overwhelming. As far as a starting point, I suggest learning to use the hoods well first, then transitioning to learning the hooks/drops. If the pictures here are not enough to help you understand the positions and the braking, ask an experienced cyclist to show you in person and imitate them. I did this some time ago, and it was more helpful than any online tutorial I could have read.And for those riding vintage bikes with handlebars like these and having trouble using them, consider updating the bar setup. You cannot use the hoods with that style of handlebars and levers, and I wish someone told me that when I first struggled with vintage roadbikes 3 years ago.
While drop handlebars are easy and intuitive for some, for others it takes practice to get comfortable with the different positions. My suggestion is to not be intimidated and just keep practicing. If you ask me, it's worth it.
 The map below is from the Indiana DNR (Department of Natural Resources). The outlined area encompasses the Crooked Lake Nature Preserve. As always, click on the images to see a larger version. The dotted line on the right is State Road 9 and the dotted line along the bottom is County Road 600N.
 A mowed path meanders along the south and east sides of the meadow. It enters the woods on the north side, weaving in and out several times before emerging into the meadow once again on the west side. This first view is looking to the northeast (from the west side of the trail).


 There's a love
  When setting up dynamo lighting on a bicycle with no provisions for it (i.e. no internal routing or special braze-ons), there is always the question of how to route the wiring so that it looks "clean." After all, no one likes to see black wires coiled around a frame's fork and tubes. When setting up the lights on my Rivendell some time ago, the Co-Habitant and I developed a nice method that is practically invisible, and I've been meaning to share it. So when we recently did the same to my Bella Ciao, I made sure to document it.
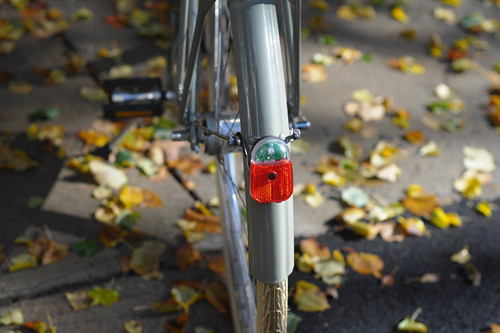 This method assumes that your bicycle is equipped with fenders, and that you are installing both a headlight and tail light. I will also assume that you already know how to connect the lights themselves; this is not meant to be an electrical tutorial.
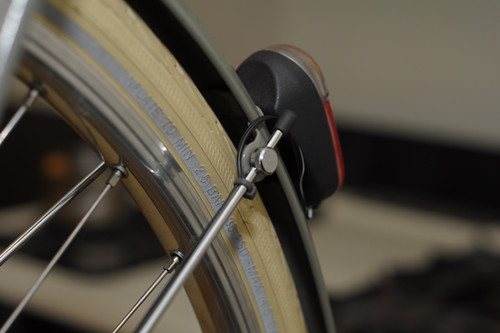 The key to our method is using as little wiring as necessary - running it in a straight line parallel to existing stays and tubes, as opposed to coiling it, and securing it with colour-matched zipties. It's a simple idea, but colour-matched zipties really do blend in with the bicycle when all is said and done. You may be surprised to learn that they are available in all sorts of colours - from bright rainbow hues, to neutrals such as clear, white, cream, taupe and gray. We use small gray zipties to route the wire from the tail light along the non-drivetrain side fender chainstay.
 In natural light, the result looks like this.
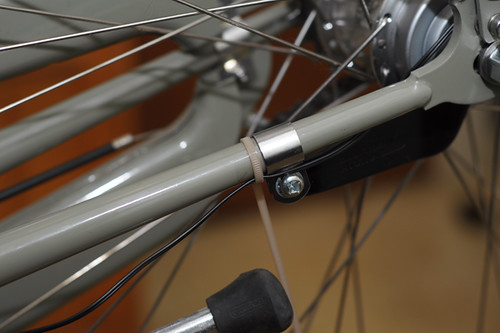 We then proceed along the non-drivetrain side chainstay, using a larger colour-matched ziptie. This frame is a sort of pale military green, and this beige ziptie blends in nicely.
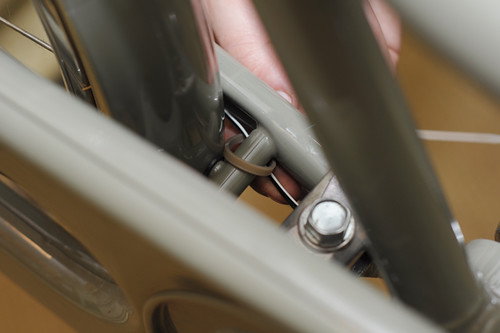 Continuing the same underneath the bottom bracket.
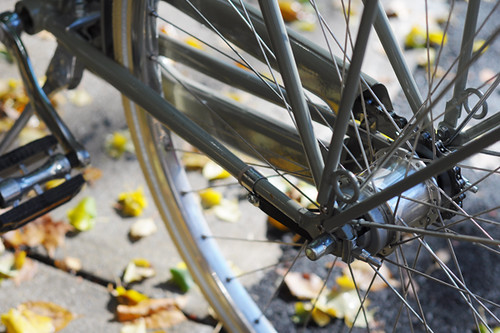 In natural light, the wiring really does "disappear" when routed in this manner, staying close to the chainstay.
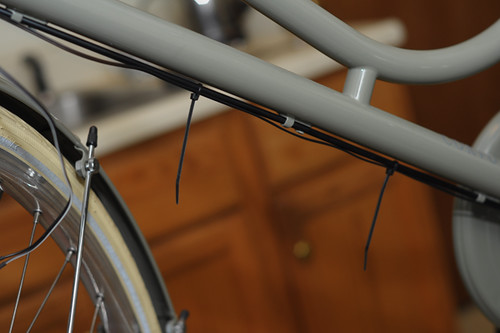 If your frame already has shifter cable braze-ons on the downtube as this one does, then you can simply attach the wiring to the shifter cable itself (small black zipties this time). Otherwise, use two large colour-matched zipties for the dwntube, like we did here.
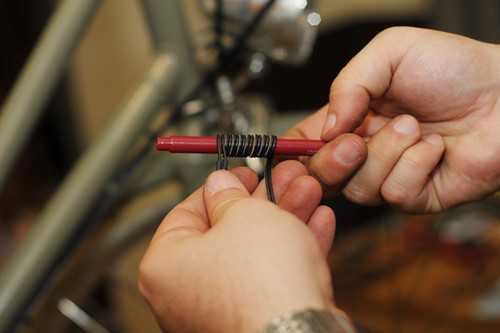 For the headlight, you will need to leave enough wire so that your ability to turn the handlebars is not constricted. We prefer to achieve this by creating a coil here. To do this, simply wrap the wire tightly around a pen or a stick.
 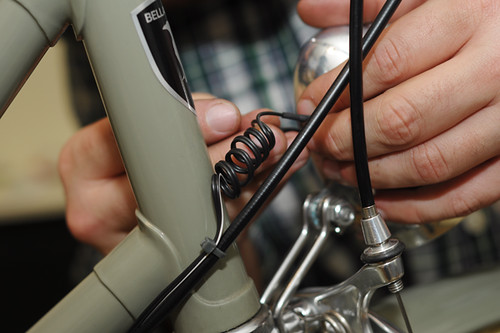 And voila, there is your coil. Notice the additional ziptie along the shifter cable, just to keep everything neatly in place.
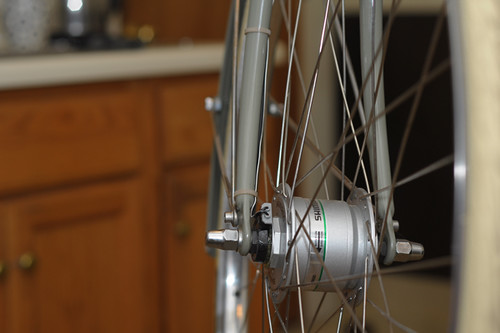 Finally, use the same colour-matched zipties along the fork as you did along the chainstays, routing the wire to the hub as tautly as possible.
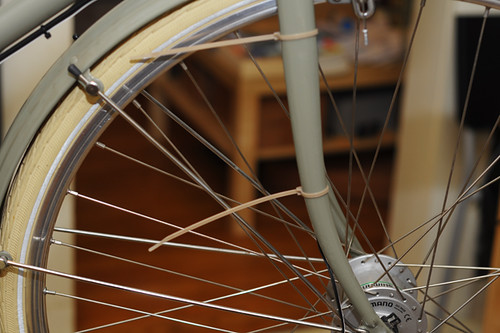 Even frames with internal routing often lack provisions for the fork, and here I find it especially important to find zipties in a colour that blends in with the paint - otherwise it can look as if the fork is cut into pieces, its elegant curvature disturbed. I am using my camera flash to show the process, but in daylight this really looks quite unobtrusive.
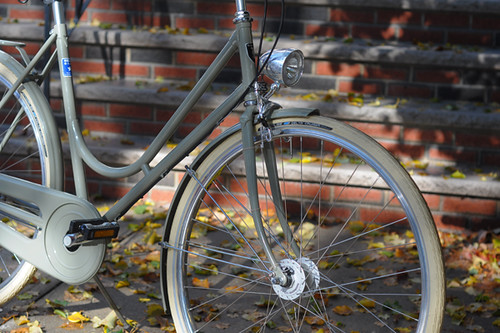 In natural light up close.
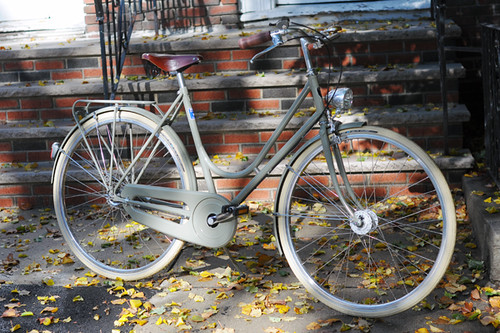 And from further away.


 Most of the area around Chaparral, NM where my son lives is flat desert country with a some low, rocky mountains. If you can call them mountains. Compared to what I call mountains they aren't much but still they are photogenic and nice to look at. The 1st photo is of the lower end of the Rio Grande River right before it goes into Texas. Chaparral is right at the Texas border near El Paso, Texas. Chaparral can hardly be called a town, more like a very small village. Remember my post from a few weeks ago that had photos of the river here in Albuquerque with lots of water, and several miles from Chaparral in the Anthony, NM area. Most of it goes into Elephant Butte Lake which is a big lake with lots of boating, fishing, and other recreation. I didn't go there this time. The rest goes to the farmers.


