Friday, March 30, 2012

Rapha Women's Line, Take 2

Rapha Women's Long Sleeve Jersey, Blue
Over the summer I wrote about being underwhelmed with Rapha's women's line, but recentlycircumstances have encouraged me to give them another chance. And by circumstances I mean their 50% off winter sale, which coincided with the sudden demise of some of my current winter cycling clothes. Long story short, I now own several pieces of Rapha gear, two of which I will review here: the women's winter bib tights and long sleeve jersey. After mypreviousRaphapost, some felt that I intentionally used low quality pictures to exaggerate my criticism of the clothing. So this time I used a proper camera and did my best to show the clothing in a flattering light, freezing my butt of on a 20° day in the process. While I usually wait longer before reviewing a product, these are winter-specific and it is probably more useful to write about them now than once winter is over. Please keep in mind that the comments here are based on a very brief period of ownership.


Rapha Women's Winter Tights

Rapha Women's Winter Tights


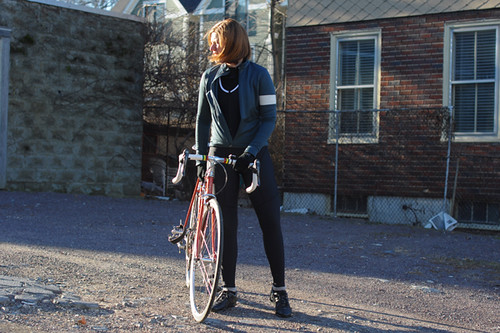
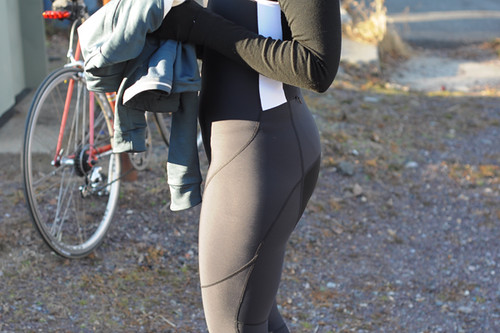
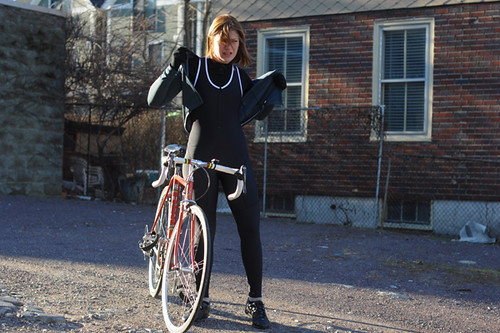
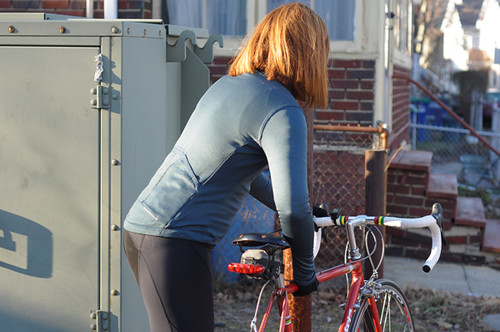
I decided to take a chance on theRaphawinter bib tights, because several women I know wear them and have good things to say about them. As you can see, these "tights" are pretty much a full-body jumpsuit. In my view that somewhat justifies the price of the garment, as the amount of warmth and coverage it provides is akin to what you would get from both tights and a vest. The fleece-lined tights are warm and windproof, designed for winter temperatures. At the time of this review, I have worn them on only one 30 mile ride so far in 25°F. My understanding (based on how others wear them) is that one dons these over a base layer and under a long sleeve jersey. For the purpose of demonstration I will show them here without a jersey on top.


I am a US size 4 and got the winter tights in Small. They are a very close fit, but also super-stretchy and don't constrict my movements at all, so I guess I am happy with the size. Multi-panel construction allows for a tailored look. The sizing seems designed for lean women with big thighs and a moderate bosom. If you are larger than a size B on top, consider going up a size or the torso might feel constricting. If you have very slim legs, consider going down a size or the tights might be loose. If you have a big bosom andslim legs... well, then you might be out of luck.


Rapha Women's Winter Tights
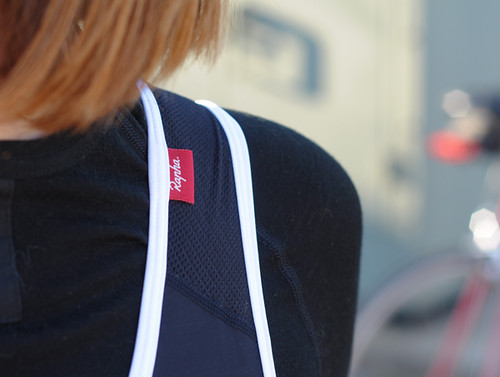
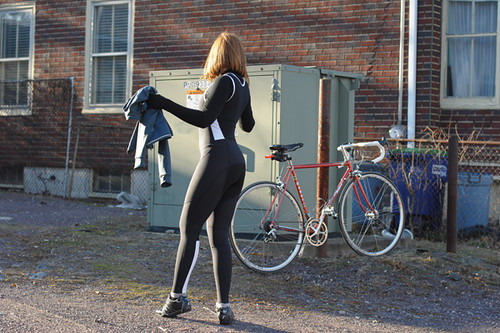
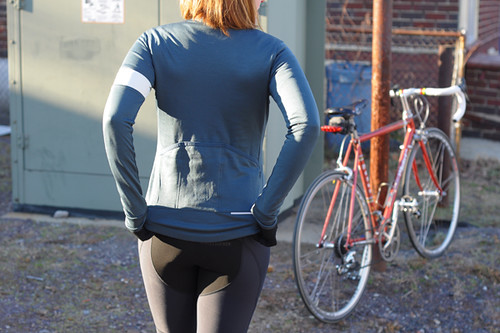
As far as quality, the tights seem to be well constructed, with no loose stitches or sloppiness. I won't really know until I wear them for at least a season though. The aesthetics are elegant, with the contrast piping and panels. Mesh panels in the shoulders and back aid temperature regulations and reduce tugging when in the drops.


Rapha Women's Winter Tights
The bottom is reinforced to prevent wear from contact with the saddle.There is a roomy pocket at waist-level in the rear that I could frankly do without (it adds some bulk under the top layer of fabric), but some might find useful. I could also do without the word "wheelsucker" embroidered on the right butt cheek. But I guess no one I ride with will ever see that, so I needn't worry.


Rapha Women's Winter Tights
A distinct feature of these tights is the large reflective strip on the back of the left calf (as another reviewer points out, the placement on the left is curious given that the manufacturer is English, but it works for American roads). I was riding with another woman who was wearing these, and the reflective strip made her very visible from a distance as she pedaled. The mesh stir-ups are another nice feature, as they keep the tights from riding up and exposing skin at the ankles while also being soft and stretchy enough to eliminate tugging.


Rapha Women's Winter Tights
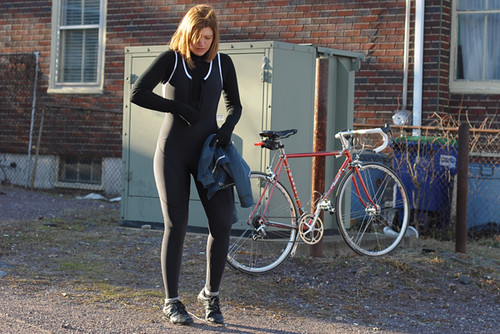
The front unzips to just above the belly-button. On a scale of 1 being easy to put on and take off and 10 being difficult, I would rate these as a 7. I would not want to be trying to pee in the woods in the dead of winter while wearing these bibs with several layers over them. The type of cycling I do is unlikely to call for that, but winter-peeing enthusiasts beware. What bothers me more, is that I find it quite difficult to smooth out my base layer inside the bibs - the zipper opening does not allow for enough reach. As a result, there is inevitably some unsightly bunching around my hips inside the bibs.


Rapha Women's Winter Tights

And finally there is the lack of a chamois. The tights are unpadded and meant to be worn over padded cycling shorts. The idea is that this way, you don't have to wash the entire massive jumpsuit every time you wear it and therefore it is a great feature. I can sort of see that, and I also appreciate that without the tell-tale pad these bibs can double as a cross-country skiing jumpsuit. But there is one thing that confuses me: Isn't the whole point of bibs to solve the problem of cycling shorts cutting into your abdomen? If so, it seems to me that the Rapha bibs rather fail at that aspect of things. Also, some might simply find it too bulky and constricting to wear fleece-lined compression tights over shorts. You may want to consider this aspect carefully before buying.


Rapha Women's Winter Tights

Summary: The Rapha women's winter tights are really more like a multi-sport full body jumpsuit. They are warm, easy to move in, attractive, and increase the cyclist's visibility on the road. On the downside, they are time consuming to put on and take off, while the lack of a chamois and the need to wear them over cycling shorts negates the waist-band eliminating benefits of bib tights and adds bulk. Given how warm these are, I am willing to deal with their limitations. But ultimately my opinion of their value will depend on quality. I really hope these last longer than a season! I would also suggest that Rapha consider offering a padded version for those who would prefer to carefully wash the chamoisto having to wear them over cycling shorts.


Rapha Women's Long Sleeve Jersey, Blue

RaphaWomen's Long-Sleeve Jersey


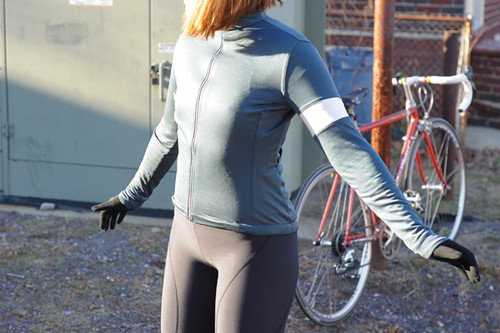
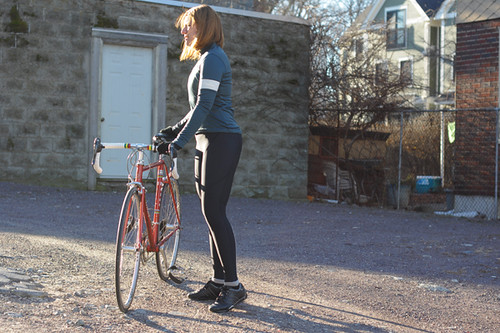
I got thewomen's long sleeve jersey to wear as a midlayer underneath my winter cycling jacket. Again the purchase was motivated by positive feedback from a couple of other women who own this garment. There are several choices for colour schemes, and after agonising over the "fig" vs the "blue," I decided on the latter. It is a pleasant slate blue colour that transitions from gray to seafoamish depending on how the light hits it. I have worn this jersey on a handful of rides so far.


Rapha Women's Long Sleeve Jersey, Blue
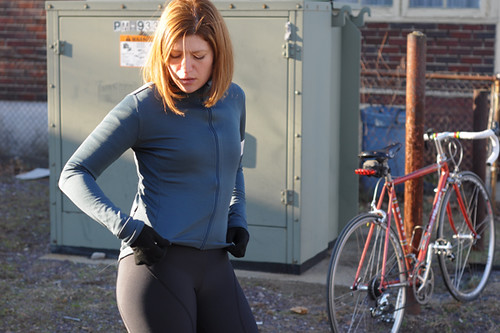
The size Small is spot-on for my US size 4 frame (worn over a sportsbra, long sleeve baselayer, and bib tights). As with other Raphawomen's items, if you have much in the way of bosom you may need to go up a size. The jersey has a full zip and drawcords to tighten and loosen the hem.


Rapha Women's Long Sleeve Jersey, Blue
This is actually a nice feature, because on some of my current jerseys the hem is too loose and on others it rides up. It is hard to get that part right for women, because of the curvature of the hips - everyone's is different. There are three deep pockets in the rear, with an inner compartment for a small pump and a zippered compartment for credit card and cash.


Rapha Women's Long Sleeve Jersey, Blue

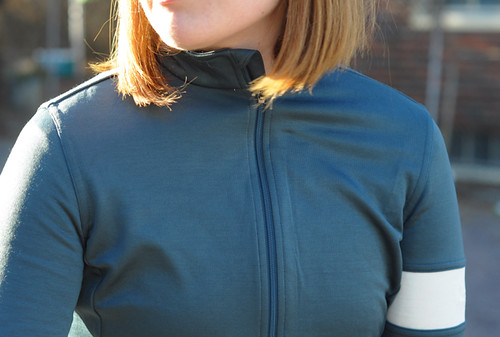
As with other Raphajerseys, there is a high collar and a tab to prevent the zipper from digging into your neck. I like the colour-matched zipper and stitching; there is not too much going on in this jersey.


Rapha Women's Long Sleeve Jersey, Blue
The white armband that screamsRaphais a feature I could do without very happily, though I understand that this is too much to ask. But I will say that, similarly to brands like Chrome, in a way Rapha has gotten itself into a corner with the strong visual branding. At this point there are people who would enjoy the functionality and quality of some of the garments, but are simply too embarrassed to wear Rapha because of what the branding has come to represent (roadie couture, backlit films of exquisite suffering, etc.). Maybe something to consider.


Rapha Women's Long Sleeve Jersey, Blue

The fabric is "Sportwool" - 52% merino wool and 48% polyester. The surface of the fabric is smooth and shiny, almost shimmery in the sunlight. It does not look or feel particularly wool-like to me, so if you are seeking the tactile qualities of wool be aware. While I am not sure that I'd be able to wear this against bare skin (I am sensitive to polyester), over a merino baselayer it is fine. Most importantly, I find this jersey to be surprisingly warm, and the best insulating mid-layer I have tried so far. Prior to getting it, I was wearing a heavy Icebreaker turtleneck over my baselayer and it was neither as warm nor as breathable. A little disappointing, because I prefer 100% wool, but I have to admit that the Raphajersey does the job. Worn underneath a windproof shell, this setup has kept me comfortable on rides in temperatures in the 20s.


Rapha Women's Long Sleeve Jersey, Blue

Summary: This is a wool-blend cold weather jersey with a number of useful features. While YMMV, it seems to work extremely well for me as a winter midlayer. The fit may be tricky for curvy bodies, and the tell-tale Raphaarmband is sure to cause some eye-rolling, but ultimately this is an effective garment that to me was worth the sale price.


Having examinedRapha's new additions to the women's line for - at a local retailer (the Ride Studio Cafe in Lexington, MA), they generally strike me as more flattering and more aesthetically pleasing than the items I commented upon in my previous post. I would love to see Rapha make a couple of jerseys in 100% merino, especially for the summer, a better fitting wind jacket in a more inspiring colour scheme for the warmer season, and arm warmers that are size-matched to their short sleeve jerseys. I would also love for Rapha to tone down some of the strong visual branding. I hope the Rapha women's line continues to expand. The more options for female cyclists, the better.

Thursday, March 29, 2012

Once in a Blue Moon


Six days after my first official Permanent, I found myself riding another. An entirely different and slightly longer route with a couple of brief stretches of dirt, but otherwise the same idea. The other day a friend was teasing that I write the most detailed 100K ride reports ever. True, it probably takes some riders longer to get through my reports than to ride the routes! But you know, there may come a time when I think a 100 km bicycle ride is not worth writing about. And that makes me a little sad. We go through our learning experiences, growing pains and all the wonder that comes with them but once. Today I appreciate that more than ever.


The Blue Moon Permanent marked this year's New England Brevet Season Kick-Off Party. The start of the ride was crowded, with a varied mix of cyclists. The bikes ran the gamut from road race to traditional randonneuring machines. Like a handful of others, I hung back and began a few minutes after the official start. Though I saw other riders along the way, I rode mostly on my own this time.


The route weaved through Boston's south-western suburbs, taking us to the scenic Noon Hill reservation and the Blue Moon Caféin Medfield. Although the towns on this side of Boston are known to be high in traffic, the route itself was remarkably quiet. Orchards and farms comprised much of the scenery, alternating with stretches of sleepy residential streets bordering bodies of water. At one point there was even a Forest Road that, uncharacteristically, went through an actual forest, rather than a series of strip malls or new housing developments! Pamela Blalock's route design skills are a rare talent.


My experience of this Permanent was very different from last week's. I didn't question whether I could finish before the cutoff time; that now seemed like a given. Instead, riding such a circuitous route solo gave me the opportunity to focus on improving my navigation skills. I made a game of trying to not go off course a single time, and succeeded. I also tried to see whether I could manage to make fewer, shorter stops while still enjoying the scenery.


I cycled the 10 miles to the start and arrived with only a few minutes to spare, not giving myself a big break before the event this time. The ride itself was just over 67 miles and I finished it in 6 hours 25 minutes. My computer shows 3,900ft of elevation gain, but the climbing was distributed in such a way that I did not especially feel it. The descents seemed tamer than last time as well. My overall average speed (including stops and the sit-down meal) was 10.45mph, which is a bit faster than last week's 9.9mph. My average rolling speed was about the same: 13.1mph. If I can improve my times a bit more, I might be able to do these rides on the camera bikesoon, with proper photo stops, and still make the cutoff - but not just yet.


After the ride I stuck around for the Brevet Season Kick-Off Party at the Ride Studio Cafe, then rode home in the dark, for a total of 87 miles. I took a quick shower, went out for a walk, then stayed up late working and woke up early to work some more. I do not feel any worse for wear after this Permanent. Unlike last time, I did not even have that crazed, feverish feeling afterward. It felt like a normal ride that just happened to be timed and counted "for credit."


There may come a time when I think a 100 km bicycle ride is not worth writing about. In the meanwhile, I am enjoying it all. The slew of new sensations that every ride brings, the shameful yet oddly liberating experience of being the weakest cyclist of everyone I ride with, and of course, the beautiful local scenery waiting to be discovered.

Wednesday, March 28, 2012

Single Speed Versatility?

Paper Bicycle, ChaincaseI've been test riding the Paper Bicycle for the past month, and as I've mentioned before it is a single speed. The gearing is pretty low: 38x17t, with 26x2.5" tires (about 60 gear inches). The bicycle is upright and it weighs around 37lb. Reading these specs, it would appear that the manufacturer geared the bike low to compensate for its weight and upright positioning, enabling the urban cyclist to handle hilly areas. In turn, it stands to reason that the bike cannot go very fast, assuming that one does not want to spin like mad while commuting: a sedate urban bike, where the single speed aims to make the uphill portion of the ride easy and assumes you will coast downhill.

However, my experience of actually riding the bike contradicts this. While the gearing is low enough to handle reasonable uphill stretches, I can also pedal downhill much of the time, and on flats I can pick up quite a bit of speed. Based on what I understand about single speed gearing, that seems implausible, and yet that's how it is.

This is not the first time I've noticed that the single speed drivetrains on some bikes can feel more "versatile" than multi-speed hubs on other bicycles I have ridden, in the sense that a single gear on Bike A can feel acceptable over a broader range of terrain than an entire 7-8 gear range on Bike B. The first time I felt this was when switching between the multi-speed Pashley and the single speed Motobecane mixte conversion, both of which I owned in -. The Motobecane was easier uphill and faster downhill, whereas the Pashley's gears would max out in both directions. At the time I attributed this to the city bike vs roadish bike difference, but I have since experienced the same effect on bikes that were more comparable. For instance, when I test rode the Breezer Uptown, I arrived on the Paper Bicycle, then rode the 8-speed Breezerover the same terrain. I had to switch between the high and low gears of the Breezer's 8-speed range constantly in order to make the bike "move" as comfortably as the Paper Bicycle moved in its single gear. It was a poignant contrast, given that the weight and upright positioning of the two bikes are comparable. Others have reported similar experiences - discovering a single speed that was able to cover their commute as well as a multi-speed bike, but without the hassle of constantly switching gears. A single speedAbicihas proven sufficient for TrishaofLet's Go Ride a Bikein Nashville, more so than her other, geared city bike.

Increasingly, there is a trend to put 7-8 speed hubs on city bikes. Some beginner cyclists I've spoken to won't even consider 3-speed hubs, let alone single speeds. They do not have exceptionally long or hilly commutes, but after test riding a couple of bikes they feel that multiple gears are necessary. It makes me wonder whether there is something about the way many new bikes are designed, that they simply do not respond well to the rider's pedaling effort and need all those gears to compensate. Is single speed versatility the flip side of the coin to hub inefficiency, or is it all about the frame design? I am far from having an answer, but this seems worth investigating. A single speed bike is easier to maintain and put together, and it is less expensive. If it's possible to design one that can handle mildly hilly terrain, why bother with multi-speed hubs and gear shifters?

Tuesday, March 27, 2012

"Time Warp and Ice Gear"

I wrote this back on 2/20/08 onour local climbing forum. That winter was the first year I climbedwith a pair of Nomics. Not much has changedin the last 5 years that I can tell really. Head lamps have gotten better. Boots marginally so but nothing earth shaking. Clothes have gotten warmer and lighter. But some of this seemed like a real revelation 5 years ago. Umbilicals and leashless toolsare common now. They weren't well received by all 5 years ago. Most of all I am just glad I finally got off the couch again! It hasbeen a fun ride.


Hopefully beginner and intermediate ice climbers and aspiring technical climbers in an alpine environment will find the info and opinions to follow helpful. Nothing new here. Twight and Gadd cover it all much better in their respective books. The two books compliment each other. Buy them. Twight’s “Extreme Alpinism” has the best coverage of the details. His book is the “required read”. Gadd takes up the technical discussion from where Twight ended. I’ve reread both in the last month several times and gleaned other's suggestions for the Internet to try out. Gear choices are constantly being out dated. Good gear makes climbing easier...and safer.


I have little time for the guys who have opinions but have yet to have btdt. So a little back ground, and still enough ego to share an opinion. Back in the late ‘70s and early ‘80s I was fortunate enough to climb a few routes that are still considered worthy accomplishments. In no special order, the 2nd ascent of Slipstream, mid January, in 7hrs with a car to car time of 14 hr. r/t and a walk down the Athabasca. An early one day ascent of Polar Circus with 3 more ascents of the route by 1982. 2nd solo of the Becky route on Edith Cavell taking a direct line up the climb from the car door, 7hrs from lacing up my boots to the summit cross down climbing the East Ridge and back for lunch. A new route on N face of Temple. The 2nd ascent of Super Couloir on Deltaform, in a storm, via the original finish. Other water fall routes like Upper weeping wall (twice), Pilsner, Carlsberg (a couple of times), Takakkaw, Borgeau LF, among many.


So nothing horrendous even by the standards 20 years ago and light years behind stuff being done today. But climbs many guys are still aspiring to as they gain confidence and skilltoday.


By ’85 I wasn’t really climbing much ice. I was doing a lot of trad climbing up to .12b. Sport routes held little interest for me. I found other hobbies and work too committing. Climbing began to take a back seat after living that life style for 20 years. At some point I realized I wasn’t climbing at all. Not climbing rock, ice or mountains! That went on for too many years.


Then in Jan '08, a full 20 years later, I'm was dragged into Canada for ice, cold turkey, off the couch.


Past 50 years old (trust me that sounds older to me than it does to you) I at least have the means to generally buy what ever I wanted for gear. Yes, time will even solve the major problem of most every dirt bag climber \:\), even this one.


I bought into the Schoeller revolution. I had a pair of stretch European salopettesfrom the '80s that I last guided and heli skied in so I knew that was the right track. Bought the Arcteryx soft shell MX top and bottoms in several weights. More on that later. Also bought a new set of tools, a buddy gave me a set of newer crampons (more later on the subject as well) and off I went. Fat, dumb and if not happy at least excited to be climbing ice again.


Avalanche conditions in Canada this winter could hardly be worse. We started off on Louise. It is cold, I mean –30C cold. I have fewer clothes on than I have ever climbed in. I have the lightest gloves on I have ever used for winter ice and the most flexible ankles in lwt boots that I could image. I hate that damn pillar no matter how many times I have climbed it (over a dozen). But with this gear Louise’s pillar is the easiest I ever seen it.


The next 14 days of ice and mixed climbing were a real education thanks to my many old and new partners and mentors willing to put up with me.


OK, here are “MY” opinions. Not every one will share them. Remember everyone has one and you too are welcome to yours here.


After a full two weeks of climbing in everything from a pissing down NW rain, a snow storm dropping 6” in an hr, and down to –30C with hallowing wind I can say hard shell clothing is obsolete for technical climbing short of some really horrendous conditions I can’t actually image being out in. And with 7 trips to the Alaska Range I can image some pretty shitting conditions. My suggestion? Buy the lightest weight, most stretchy garments and learn to climb in what Twight calls his “action suit”. If it aint got a hood that will go over a helmet easily don’t buy it.


Only caveat to that is your base layer. You might want to think about putting some wool next to your body and a light synthetic layer/s over it. Add hoods that will go under and over your a helmet. The “R” series Patagonia hoody or the really simple Nike hoody (which I like even better for cold weather) works well. Thumb loops on the sleeves have been around 30 years at least and are really cool features in cold weather BTW.


Gloves?

Always take a few pair in the pack or pocket. At least one pair specifically for when it gets really cold from a change in weather, your exhaustion or a long, cold belay. Depending on the climb I will use a thick glove or a mitten. You'll want to error on the side of caution when choosing the “big” glove. You don’t want to pull out the ‘big ‘uns” and find you still are not warm enough and screwed. Heat packs are a good option to carry as well. Remember hydration and calorie intake are as important or more so than big gloves and a belay jacket. I’m using a really light glove made by Mountain Hardware, the “Epic”. REI has the same glove just a bit less durable. Go light…you’ll be amazed. Carry spares to stay dry as required. I’ve only pulled my “big” gloves once this season. But I have gone through up to three sets of the lighter gloves to keep my hands dry. The light gloves aren’t very durable. Leather rappel gloves are a good idea and work well on some hard mixed depending on temps.


Hats? Headbands under the helmet regulate heat better with helmet and layers of hoods than a hat will. The band will also add to your warmth if pulled down to your neckline and nothing to drop. I no longer carry a hat. But I pull on or off any one the layers of hoods over my helmet at belays or while climbing. Try that with a hat while climbing a hard pitch!


Leashes? This ought to get some comments. You’d have to be an a complete, uneducated knob to climb with a leash on a modern tool. No ifs on that one. The human form and the tools are finally a synergistic extension of the mind while climbing. Ice climbing at any level is simpler, warmer and EASIER leashless. Hard to believe but that will make even hard grade 5 ice more secure.


Several of my buddies disagree some with my conclusions and they know the differences, tells me I only came to my conclusions because I haven't climbed ice in 10 years so the change was easier for me. Remember I am an old guy, and trust me if leashless wasn't faster, easier and warmer I would NOT be doing it. I don't give a shit about appearances, I just want to get up the climb as fast with the least amount of effort as possible. Leashless is a big part of both.


Umbilicals? For what the mind can’t control? If you are less than 70m from the ground climb leashless and forget the umbilical. If you are higher than 70m put an umbilical on the damn thing. Nothing worse than sending your 2nd your spare toolor climbing a hard pitch with one tool or being forced to jug or worst of all rap. Trust me, an umbilical is better than wrecking a good relationship or worse yet an expensive trip.


I now flatly refuse to climb with anyone that hasn’t got their tool tied on to something. My time and experience is just too valuable to me to waste it on a tool getting knocked off at a belay or dropped for what ever reason, including me knocking it off by accident. How about leaving a tool at a v thread on the rap. Thathas happened more than once to even some very experienced climbers. Umbilicals use to be seen as a sign of incompetence. Now I see there lack as a sign of ignorance on anything past a short sport route. Before you start rolling your eyes...take a look at what the "big boys" are doing these days on alpine routes. Makes me think that passing 4 tools around between 3 guys (after dropping two leashless tools) on one of the bigger/harder alpine routes made a broad impression.


I've already had to rap 2000' after a partner dropped a tool on a hard alpine route in perfect weather. Lost a perfectly good alpine rack as well in that experience. Not excited to repeat that costly adventure.


Boots? Fruit boot technology is catching up to the Mtn. boot technology. You’ll climb different in them but you’ll also climb better. Ice becomes more like rock climbing in the soft ankle boots. Haven’t found one I want to send 1000m of hard 55% alpine ice in but it is entertaining trying to figure out how to rest the calves with French technique at every opportunity. More time in soft boots will likely encourage me to take them on endurance alpine ice.


Now we have both warm boots and soft ankle boots that have a rigid sole for even my size 12 feet. They can be amazing. Check out the usual suspects to see what fits you. I like the Batura for cold stuff close to the road (they are hard to dry out) and the Spantik for anything over a day out. There are much lighter boots I could be climbing in. We’ve only just seen the beginning to the newest boot technology. In the future look for a dbl. layered fruit boot that is warm enough for Denali which you’ll actually want to use for that M10 at your local crag.


Tools/crampons? Any of the newest tools from Grivel, BD or Petzel works better that anything from even a few years ago. BD seems to have the biggest issue breaking picks. Grivel has the solid reputation of bomb proof and no one can question how well they climb. Petzl stuff is not cheap but climbs very well and is very durable as well. The other brands at the moment are simply "hangers on". If you aspire to climb hard forget anything that doesn’t have good leashless support.


Mono points? If you want to do hard mixed it is the only game in town. Not impossible to climb hard with dual front points but why bother with the extra effort? Same with fruit boots. You don’t intentionally climb hard rock in big boots. Why would you do hard mixed in them? You need to take the time to fit any crampon perfectly. Then take the first few days you climb in them and fine tune the fit. Dropping a tool sucks. Dropping a crampon can easily get you DEAD.


Ice screws? If you aren’t currently climbing with the newest generation of Grivel screws, specifically the Helix, youare wasting energy. I’ve tried EVERY new screw design currently on the market, in almost every snow and ice condition you can think of. With all due respectand with no hype, no bs, there is no other manufacture even close to Grivel's current production. The Grivel screws are as revolutionary to ice climbing as Jardine's Friends were 30 years ago. Big statement I know. But placing good gear, easily, where you want it instead of were you could makes climbing much, much easier and a lot safer.


Add some quick draws, and a few slings made to absorb the load and pretty much set. The lwt wire gate biners hold everything together and don't easily freeze. Plate or “guide” belay devices that will allow you to belay off the anchors with a documented catch on a 400’ fall (yes FOUR hundred feet) will take the rest of the load.


My rack? Helix mostly and only one 22mm screws. With the newest test results I have switched to a lot of 13cm shorties. The Helix stack on a carbiner just fine. Buy the big plastic racking biners from BD or Petzel. They work even better for racking screws and axes.


Headlamps? I spent the last week intentionally climbing many of the 30 or so 60m pitches in the dead of night with a headlamp. I have the high tech rechargeable BD and a cheap 3 AAA Petzel. I prefer to climb with the Petzel as the softer light is easier on my eyes. The BD on the bright halogen setting was good for scoping out the ropes on free hanging 50m raps and complicated route finding. But the Petzel was tiny to carry (unnoticed) and more than enough to get down anything and good enough to get me up anything I can climb.


I am leading at the same level of difficulty on ice now, as I was 25 years ago. You have no idea how unrealistic that really should be. All the while with less effort, while being safer. The main reason, the Grivel Helix. The rest of the stuff mentioned just adds to a more enjoyable and fun experience. Gear will always change over time so stay up on it if you want to keep up.


Spend your money wisely. Thirty year old designs got me up some decent climbs back in the day. The new stuff, if you buy wisely, makes those same climbs much, much easier. That only makes the next level of difficulty much easier to reach. Stay safe and hopefully I’ll see ya out there! I'm the old guy with white hair, and funny tweetie bird boots, stop by and say "hi".
Edited by Dane (02/20/08 6:34 PM)


Interesting comments on the original thread:


http://cascadeclimbers.com/forum/ubbthreads.php/topics/774878/


Happy holidays to all! And thanks for reading Cold Thistle..


Monday, March 26, 2012

What a View!

Tuesday, June 7th - - Man joined us for lunch again – this time we went to The Pantry at The Lions House. We all selected the “Coca Cola Roast Pork” and were not disappointed. It was so tender you could cut it with a fork and it was scrumptious. The food here in Salt Lake City has been excellent!


After lunch, and even though it was my next-to-last day of research, Man insisted that we take in the view from the 27th floor of the Church Office Building. It was definitely well worth the time. The weather couldn't have been much better.


Looking west and a little south with The Temple in the foreground and the Tabernacle (oblong , shiney building) behind it. And behind the Tabernacle is the Family History Library. The tall building south of the Library is the Plaza Hotel.


Looking west along North Temple Street. The building to the right of the Tabernacle is the North Visitors Center. Off in the distance is the Great Salt Lake. If you look closely in the pictures below, it appears as a narrow strip of light blue running along the base of the mountains.


Looking west and a little north. The building on the right, with the trees on the roof, is the Conference Center.


Looking toward the northwest.


Looking north toward the Capital Building.


The view to the east. North Temple Street on the left and South Temple Street on the right. The campus of the University of Utah stretches along the foot of the mountains.


And, finally, a view to the southeast.

Saturday, March 24, 2012

Wordless Wednesday :: Big Sandbox

Great Sand Dunes National Park & Preserve
Southwest Colorado May 1979
Copyright © 1979/.. by Rebeckah R. Wiseman

Friday, March 23, 2012

Thursday, March 22, 2012

Red Yuca


A red yuca blossom which is much smaller than the native New Mexico yuccas with white blossoms.

Wednesday, March 21, 2012

In the beginning


I can't even remember the last time I was able to shoot a sunset... I've been missing sunsets lately because my work schedule has me working during the "magic hour" when the light does wonderous things. SO, here is a sunset image from late October, 2007. I like to call this image "In the beginning" because when I viewed it for the first time on the computer screen it had the feel of being prehistoric... harking back to the days of single-cell life forms... kind of a "dawn of creation" feel, if you will. I don't know if it's the color of the sky, or the rocks on the shoreline, or a combination of the two, but that's what I think of when I view the image.


Saturday, March 17, 2012

Wrapping tool shafts?


The reason I wrap my tools almost full shaft (2" shy of the head) is I like to do a lot of high dagger position on easier alpine terrain. And I actually like climbing easier terrain with radically curved tools. I'll run my hand from the upper grip to the head of the tool to avoid as many placements as possible. Just to save strength and climb faster. A good tape job keeps the hands warmer on aluminum when it is really cold out. And I like the rubber texture over bare aluminum or carbon fiber. On steep ice I like to match on the second grip so I wrap there with better tape than Petzl supplies and wrap over the the BD Fusion/Cobra upper grip and higher on the shaft just for consistancy. While you are at it, easy enough to wrap farther up the tool and can't see that it hurts anything besides adding a bit of weight. If for no other reason, it helps me at least feel more secure.

Climbing Shooting Gallery on Andromeda a couple of winters ago in -30 temps and some deep snow was the first time I needed more insulation on the shaft for the high dagger position. Freaking cold tools that bite back and then cold hands through the powder snow to get a good stick. Not on my long list of "fun".

A quick look at several of the pictures in the blog will show a high dagger position (anyone climbing on Nomics) where a wrapped shaft will be warmer.


> What is the name of the tape that you use on your tools? I
> have been using electrical friction tape but I think there is
> something better out there more similar to the tape on the >Nomic.

You can generally buy this stuff at Lowe's, Home Depot or any big hardware store and on line.
There is a link in the comments after the post. Depending on how you wrap your tools one role of tape can do two tools. I use the tape for insulation so I use one roll per tool and throw the extra away. Stuff is fairly cheap....under $10 per roll.

Petzl Nomic tape is a little thin for my taste and not that durable but it is light in weight and sticky enough. I suspect it is the 3M Temflex.

3M Temflex #2155 Rubber splicing Tape

What I like better is similar but thicker, way stickier and offers better insulation.

Scotch brand 2228 Moisture sealing Electrical tape

3M Temflex 2155, "rubber splicing tape" is the same stuff Petzl uses but a lot cheaper in this form. One role will easily do two tools.

The better choice imo is Scotch brand 2228 Moisture sealing electrical tape. One role of 1" x 4" does one tool for me. It is heavier/thicker/way stickier than 3M and has lasted me 4 seasons so far (with no end in sight, on ice and alpine) and is always sticky, wet or dry. I use one role per tool with a tiny bit to spare on a Nomic (1" X 4') . You just need to watch what you lay the tools against 'cuz the stuff is so sticky it will wrap around anything, clothing, your other tool, helmets...you get the idea. Kinda like the climbing version of silly putty.

You don't need to tape the ends on either as it is self sealing and is easy to apply.

Nothing else even close that I have seen. 3M is cheaper and works fine. The thicker Scotch brand stuff is what I use to wrap the tools I climb with.

Thursday, March 15, 2012

Death Valley National Park

After six days at Joshua Tree, I traveled north to Death Valley National Park, arriving there on Tuesday March 23rd.

When I arrived at Texas Springs Campground (sort of in the central portion of the park near Furnace Creek) it was almost full. It's one of those first-come, first-served self-check-in campgrounds, so you have to drive around and find an empty spot. It took a while but I pulled into what I thought was an open site at the same time as someone else pulled in to the one next to me. We looked at each other and said, “Hi neighbor!” But a few minutes later they pulled out and went to another spot. As I was standing there looking around, a little old lady (the 80-year old camp host) came up and told me I was in a handicap only site, so I had to move. She said there were only three empty sites left and told me where they were.

As I pulled into my next selected site, I saw that my new neighbors were actually the young couple that had pulled in beside me earlier. We looked at each other and laughed. They had gotten the last site that had a picnic table and fire ring. My site had nothing. But it was better than no site at all. Being nice neighbors, the young couple (Ian and Jennifer) invited me to join them at their table and campfire. They were very sweet and pleasant. We had a wonderful time sitting around the campfire in the evening and talking the night away, literally.

We were neighbors for Wednesday night also and once again they were gracious and companionable and we spent another evening talking around the campfire. By the time the night was over, we each knew quite a bit about the other. I spent two more nights at Texas Springs. On Friday night, Ian and Jennifer joined me at my camp site after spending Thursday in the back-country. (I had moved to a new site Thursday morning with a table and fire ring.) Thank you, Ian and Jennifer, for helping to make my evenings in Death Valley so enjoyable. It was great fun!

Death Valley from Dante's View, 5500 feet above the valley.

The Golden Mountains. Those two little vertical “lines” in the middle of the picture are people!

This is an area known as the Artist's Palette.

At Zabriskie Point.

Zabriskie Point.

The Devil's Golf Course. Telescope Peak, in the background, is the highest peak (over 11,000 feet) in the Panamint Range that borders Death Valley on the west.

Close up view of the Devil's Golf Course. In 1934, it was determined that the salt and gravel beds of the Devil's Golf Course extend to a depth of more than 1,000 feet. Later studies suggest that in places the depth ranges up to 9,000 feet.

The salt flats at Badwater, which is the lowest point in Death Valley at 232 feet below sea level. Walking on the salt flats was strange. It looked like concrete but there was some “give” in each step. In several spots there were muddy pools of water where small holes had been made in the salt flat.

Wednesday, March 14, 2012

Lower Hackberry Canyon


The first of two hikes that we did on Easter Sunday was Lower Hackberry Canyon. Similar to the Escalante River hike, this one would be mostly flat. It turned out to be a very enjoyable hike, as the floor of the canyon had a steady flow of water and the stream bed was almost entirely sand. The water depth averaged around 2 to 3 inches, so I actually decided to do most of the walk barefoot. The sand and water felt great on my feet and were a welcome change to the hot, dry hikes that we've been doing up to this point. An added bonus was that we got to hear several Canyon Wrens singing as we made our way up and down the canyon!

Bonita

My quarter horse mare, Bonita decided to have a running play day. Here are some photos of her.


Bicycle Bans in Parks and Cemeteries


A number of public and private parks in the Boston area do not permit bicycles on the premises. Some cyclists complain about the ban, because the green spaces make for pleasant and convenient shortcuts through congested parts of town - for instance, thePublic Garden and Harvard Yard. Others find it perfectly reasonable that some parks are reserved for being enjoyed at walking pace. I am mostly in the latter camp, and so it did not bother me to learn that the historicMt. Auburn Cemetery I planned to finally visit this weekend did not allow bikes.


Amorbid paradise of Victorian design known as America's first garden cemetery,this enormous park offers visitors miles of roads andwinding trails. There are ponds, botanical gardens, wild woodsy areas, birdwatching opportunities, and a number of remarkable architectural landmarks. Although the cemetery is still active, the administration promotes it as a park andencourages both local visitors and tourists. A brief list of rules asks to be respectful and refrain from activities such as picnicking, sunbathing, jogging and cycling. However, as I learned during my visit, motor vehicles are allowed. The ban on bicycles is not part of a vehicular ban, but a recreational one, whichputs things in a different light. What of those who use bicycles for transportation? The reasoning behind cars being permitted, is that it can be challenging for the average person to explore the vast grounds on foot. The noise and exhaust fumes the cars produce, as well their effect on the pedestrian visitor experience (those walking must stop and move aside in order for a car to pass on the narrow roads) are all excused to accommodate their transportational function. Would bicycles really be more of anuisance? It seems to me the logical and fair solution would be to either close the park to vehicles entirely (except for maintenance work and funeral processions, of course), or to allow both cars and bicycles.


Rules regarding bicycles in parks are a reflection of cultural perceptions. Are bicycles inherently offensive in a cemetery because the very sight of them suggests recreation? Or are they legitimate vehicles that - unlike cars - will help protect the tranquil nature of the grounds, flora and fauna?

Monday, March 12, 2012

Ice tool rotation?


1st genPetzl Nomic and a new Trango Raptor


"Here is a bit of rehashed info (from ) on the rotation issue some are having with the newest tools.


If you have bought a "new" tool that looks a lot like a Nomic something worth pondering if it isn't "working" quite right for you.A few people coming from a Nomic are finding an uncomfortable "bounce" in a few of the newer tools on ice and the tool being a little scary when pulling bulges. If you are new to this kind of tool likely you will have even more problems climbing pure ice and be blaming all sorts of things. Generally what is getting blamed is not going to be a "fix".


Climbers have little or no no institutional memory generally.

Yes even a couple of degrees one way or the other on pick angle will make a difference. But if it were only that obvious it would be an easy fix. Blaming the pick angle as "too steep" generally isn't the problem. I can think of two tools specifically that opening up the grip even just a little and gaining more rotation in the swing makes a big difference.


It is not a hand /glove size issue for length of grip. Much as one might first think between pick angle and grip size. I've foundthat it is neither of those particular issues.


more rotation


less rotation


Many of us asked for a spike on the Nomic. ThenBD gave it to us as the new Fusion. But if you have climbed very long you'll remember how we all choked the end of a shaft to get a better swing on short tools often almost negating/chopping the spike off all together for steep ice performance to eliminate bounce and help pulling bulges smile BD's Fusion spike you can remove. Take a close look at thenew DMM, the newest Grivel "Machine", Edelrid's, Camp's X Dreamoffering orTrango Raptor. Not all the grips are the same. Tight grips for the little pinky limit rotation as do spikes (most every one's) or additional blades (Petzl). Bigger is likely better when it comes to the size of the constriction for the little finger. Smaller is better on the spike. Simply because either in the wrong size(any size?) willlimit the rotation available from the tool. Limited rotation means a unfriendly tool in many ways on pure ice.


Brian pulling on 1st gen Nomics


For some the arc of swing on a new tools with a spike intact is limited to small side of 180 degrees without changing your grip. While the olderNomic and a smooth pommel (no blade) can go something like 210 degrees. Don't hold me to the exact numbers but realise one tool can swing a bigger arc than the other inside the palm of your hand. It is important for pulling bulges.


Nomic/Fusion over lay


Very cool to have a removable spike or no spike. Remove the spike for steep mixed and ice and you'll gain some but not all of the arc/rotation back. Most of the bounce will also disappear. With the use of a Dremel/grinder/hand file (or just some good rough emery paper) you can get an equal amount of swing arc on the new Fusion/Raptor by rounding the inside and end of the pommel more like the olderNomic grip. Might make a big difference for you if you are having small issues with any of the newertools with a tight bottom grip.Opening up the trigger slot on the bottom of the grip will gain rotation of the tool in your hand.


A simple, inexpensive mod, takes just a few minutes with power tools, that might make a big difference for you. Down side is you loose the umbilical attachment on the spike. But that's not a big deal on hard cragging anyway and most will use umbilicals and the spike on longer stuff no matter what small disadvantages on hard technical ground they both might create.


More rotationin the shaft will alsoallowa strongergrip with less effort. Much as you might like that super tight grip on your little finger. Some times bigger is better!"


DMM Switch


Edelrid's


Trango Raptor


Camp X Dream


That is the modern stuff. The idea of the tool having enough rotation in the hand to be useful is not new. I didn't come up wiht this stuff by myself. Just been around long enough to see how it has changed climbing and always made it easier if the reasoning is better understood.


Here are the ferrule and spike from the classic Chouinard Bamboo Piolet (top) and the secondmore technical tool, the Chouinard Bamboo Zero (bottom). The Zero has been taped for a better grip.


The Ferrule on each tool is the same size. The spike on the Zero is almost exactly a 1/2 size replica of the original Piolets. 6cm cut down to 3cm. One reason....and that was to allow better rotation in the hand. Which resulted in easier sticks and less effort.


Some even went to the extremeand prefered nospikefor their own water falltools.